![]() [1] 2X [2] is now an official member of the Digi-Sign Affiliates, Resellers & Partners [ARP] Network. The agreement [3] means that all 2X Distributors and Resellers are automatically members of our ARP Network. Your membership means you an issue and manage SSL certifiates with ease and also provide a new, simple 2X security 'add-on' that will benefit all 2X partners and customers. Learn more below:
[1] 2X [2] is now an official member of the Digi-Sign Affiliates, Resellers & Partners [ARP] Network. The agreement [3] means that all 2X Distributors and Resellers are automatically members of our ARP Network. Your membership means you an issue and manage SSL certifiates with ease and also provide a new, simple 2X security 'add-on' that will benefit all 2X partners and customers. Learn more below:
 |
Digi-SSL™ Advantages |
|
& Digi-Sign | ||
|
|
Digi-Access™ Advantages |
|
Digi-Access™ Instructions | ||
|
|
Sales Tools & Support | ||||
Read the instructions for the 2X Digi-Access™ online demonstration. Then....
...take the 2X Digi-Access™ demo'>> [11]
There are three very simple steps to getting your 2X Digi-SSL™ certificates and these are as follows:
1.Generate the Certificate Signing Request [CSR [18]] on the 2X IIS Server.
2. Login in to your 2X Digi-SSL™ Service system and paste the CSR into the field on this form, then select 'Microsoft IIS5.x and later' and choose either 1, 2 or 3 year(s) before using the 'Process the Request' button.

The 2X Digi-Access™ certificate offers what is called 'two factor authentication'. In the standard version of the 2X Application Server, you login with a username and password. The username and password is 'something you know' and this is single factor authentication.
In the Digi-Access™ version of the 2X Application Server, in addition to a username and password, to login you must also have a Digi-Access™ certificate. The Digi-Access™ certificate is 'something you have' and this adds a second layer of security known as two factor authentication.
Getting a 2X Digi-Access™ certificate takes three simple steps [20]. The most important of these is the very first step.
In the first step, users are directed to the 2X Digi-Access™ enrolment page where they must complete a simple online web form [21].

Important:- Users must complete this form accurately with their correct personal information. Failure to complete this form correctly, may mean that the Digi-Access™ certificate is not correctly configured and the user may also have to repeat the process.
This is the main 2X Digi-Access™ Help page and provides all the support pages you require to own and use your 2X Digi-Access™ two factor authentication certificates.
You can return to the 2X Digi-Access™ [22] home page or continue browsing by using the links below. And remember, to get the most extensive help file access and or to contribute, Login [23] or Register [24]
The 2X Digi-Access™ demonstration starts with the 2X Portal Login. Click on the Apply Now [25] button to start the demo:
1.You will be directed to the 2X Digi-Access™ enrolment page where you must complete a simple online web form [26]. This web form has a help button opposite every field to ensure that you correctly complete each field on the form, so use them as required:
In this form you must provide the following details:
In addition you will also be asked to select a Secret Question and to provide your Secret Answer:
2. Once the above form is completed and submitted, your 2X Digi-Access™ certificate request will be confirmed

Important Note:- You must use the same browser and the same computer for ALL steps in the process.
Follow the on screen instructions to complete the process
Now that you have your 2X Digi-Access™ certificate you can go to the 2X Portal Login [25] page.
| Allow 10 Minutes |
 |
|
The 2X Application Server [27] runs on a Microsoft® IIS server where there are specific default error pages designed to work with Digi-Access™ certificates. To enhance the user experience you should replace these default error pages with the customised Digi-Access™ error 403 pages [28].
The error handlers within IIS display default error pages depending on the specific issue that occurs on the server. The error message on each of these pages and their purpose are explained below.
Most error pages on IIS can be customised [29]. The default 403 error pages that relate to the use of Digi-Access™ are stored in the C:\WINDOWS\help\iisHelp\common\ folder. The 2X Application Server Administrator should download the Digi-Access™ error 403 pages [28] and place them in a new folder: (e.g. C:\WINDOWS\help\iisHelp\digi-access\ ). The server should be configured to display these new error pages before being restarted to complete the setup procedure.
Read these instructions to configure Digi-Access™ [12] on the 2X Application Server
| Allow 30 Minutes |
|
|
Enabling Digi-Access™ client certificates for two factor authentication will take 30 minutes (or less). Configure the 2X Application Server by following these simple steps (for full detailed instructions and screenshots, read the IIS Support [35] pages):
|
1. Download and save these two certificates:
Digi-Sign Root CA [36] Digi-Sign CA Digi-Access™ Xs [37] 2. On the server, click the Start button, select Run and type MMC, before clicking the 'OK' button 3. You should now be in the Microsoft Management Console and should follow these steps: 4. Now all you need to do is import the Digi-Access™ Root certificate, following these steps: 5. Then import the Digi-Access™ intermediate CA certificate, as follows: 6. Go to Windows Administrative Tools and open the properties window for the website that you have enabled SSL on. Open the Directory Security by right clicking on the Directory Security tab and then follow these steps: 7. Start Internet Services Manager, or open the MMC that contains the IIS snap-in. |
Read these instructions to find the OU Codes [38] for your customer.
| Allow 5 Minutes |
|
|
For every 2X Digi-Access™ customer, a unique Digi-Access™ RA is activated so that the customer can manage the end users Digi-Access™ certificates. Once the order [15] for your customer has been approved, the Digi-Access™ RA is activated and you are notified automatically.
To complete the 2X Application Server configuration you require the two unique organizationalUnitName [OU [39]] codes. These are provided automatically in the Digi-Access™ tab of the Digi-CA™ Control Centre (Digi-Access™):

1. will have access to the Digi-Access™ RA because you are managing and issuing certificates to the end users; or
2. your customer's Administrator is managing the certificates and therefore you do not have access to the Digi-Access™ RA
In the case where you do not have access the to Digi-Access™ RA, ask your customer's Administrator to provide the organizationalUnitName 1 and organizationalUnitName 2 cosdes as shown on the Digi-Access™ tab of the Digi-CA™ Control Centre (Digi-Access™)
There are three very simple steps to getting your 2X Digi-Access™ certificate and these are as follows:
1.You will be directed to the 2X Digi-Access™ enrolment page where you must complete a simple online web form [21]. This web form has a help button opposite every field to ensure that you correctly complete each field on the form, so use them as required:
In this form you must provide the following details:
In addition you will also be asked to select a Secret Question and to provide your Secret Answer:
2. Once the above form is completed and submitted, your 2X Digi-Access™ certificate request will be confirmed
Important Note:- You must use the same browser and the same computer for ALL steps in the process.
Follow the on screen instructions to complete the process
Now that you have your 2X Digi-Access™ certificate you can go to the 2X Portal Login [40] page.
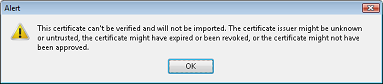
The Digi-CA™ [41] Certificate Authority [CA] system that issues the Digi-Access™ end user certificates is compatible with most commonly used browsers. These support pages are provided for users that want to understand more about Microsoft® Internet Explorer® screen warnings and/or other browser events.
The most commonly reported error message is an 'Internal Server Error' or 'Error 404 Page Not Found'. The reason for this error message is that the URL is not correctly entered into the web browser's address bar.
To avoid this issue, copy the entire URL, without any breaks, and paste it into the browser's address bar.
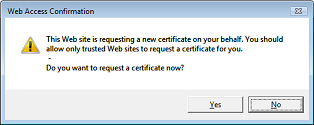
If your browser does not have ActiveX [42] controls enabled, you will see the following warning messages. Ensure you read and follow these instructions carefully:
|
You need to authorize the "Microsoft Certificate Enrollment Control" to create a certificate request for you: • Click here to reload this webpage, then... • When you see a Security Warning popup, click Yes to install the "Microsoft Certificate Enrollment Control". |
|
To get past the security warning shown above, you need to authorize this webpage to create a certificate request for you: • On the Tools menu, select Internet Options. • Click the Security tab, select the Trusted sites zone and click Sites. • Ensure that https://www.digi-sign.com is in the "Add this website to the zone:" box. • Click Add, then Close, then OK. • Finally, click here to continue... |
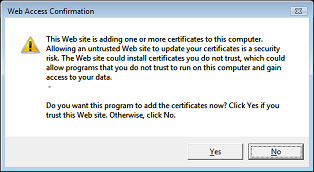
When collecting your Digi-Access™ certificate, depending on what version of Microsoft® web browser you are using and how it is configured, you may see the following two dialogs:
1. This warning highlights potential concerns relating to Trusted certificates. It is both confusing and unclear. The Digi-Access™ certificate used for two factor authentication is of a specific configuration that Microsoft® is not 'familiar with'. You can ignore this message and should select and click Yes.
The Digi-CA™ [41] Certificate Authority [CA] system that issues the Digi-Access™ end user certificates is compatible with most commonly used browsers. These support pages are provided for users that want to understand more about Mozilla screen warnings and/or other browser events.
The most commonly reported error message is an 'Internal Server Error' or 'Error 404 Page Not Found'. The reason for this error message is that the URL is not correctly entered into the web browser's address bar.
To avoid this issue, copy the entire URL, without any breaks, and paste it into the browser's address bar.
When collecting your Digi-Access™ certificate, depending on what version of Mozilla browser you are using and how it is configured, you may see the following two dialogs:
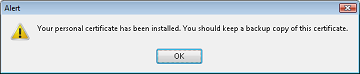
1. This warning is simply a reminder to you to backup your certificate. Although this is good practice, the specific Digi-Access™ certificate used for two factor authentication does not permit backing up. This prevents users from sharing or copying certificates and protects the integrity of the security being offered. If you should ever loose your Digi-Access™ certificate, for any reason, you can request a new one. You can ignore this message and simply click OK.
Depending on your operating system and browser version, you can view your Digi-Access™ two factor authentication certificate using the instructions below:
|
Microsoft® Internet Explorer® |
Mozilla Firefox |
|
1. To view your Digi-Access™ certificate in Microsoft® Internet Explorer®, use the Tools menu (you may have to press the 'Alt' button on your keyboard to view this menu) and then select Internet Options 2. In the Internet Options dialog box, select the Content tab and then click the Certificates button  3. In the Certificates dialog box, select the certificate you wish to examine and then click the View button  4. The chosen certificate will be displayed where you will be able to see:
 |
1. To view your Digi-Access™ certificate in Mozilla Firefox, use the Tools menu and then select Options 2. In the Options dialog box, select the Encryption tab and then click the View Certificates button  3. In the Certificate Manager dialog box, select the certificate you wish to examine and then click the View button  4. The chosen certificate will be displayed where you will be able to see:
 |
Depending on your operating system and browser version, you can delete your Digi-Access™ two factor authentication certificate using the instructions below:
|
Microsoft® Internet Explorer® |
Mozilla Firefox |
|
|
1. To view your Digi-Access™ certificate in Microsoft® Internet Explorer®, use the Tools menu (you may have to press the 'Alt' button on your keyboard to view this menu) and then select Internet Options 2. In the Internet Options dialog box, select the Content tab and then click the Certificates button 3. In the Certificates dialog box, select the certificate you wish to examine and then click the View button 4. The chosen certificate will be displayed where you will be able to see:
5. Once you have viewed and confirmed this is the Digi-Access™ certificate you wish to remove, return to the Certificates dialog box, select the certificate and click the Remove button |
1. To view your Digi-Access™ certificate in Mozilla Firefox, use the Tools menu and then select Options 2. In the Options dialog box, select the Encryption tab and then click the View Certificates button 3. In the Certificate Manager dialog box, select the certificate you wish to examine and then click the View button 4. The chosen certificate will be displayed where you will be able to see:
5. Once you have viewed and confirmed this is the Digi-Access™ certificate you wish to delete, return to the Certificate Manager dialog box, select the certificate and click the Delete button
|
![]() [1] 2X [46] is now an official member of the Digi-Sign Affiliates, Resellers & Partners [ARP] Network. The agreement [3] means that all 2X Distributors and Resellers are automatically members of our ARP Network.
[1] 2X [46] is now an official member of the Digi-Sign Affiliates, Resellers & Partners [ARP] Network. The agreement [3] means that all 2X Distributors and Resellers are automatically members of our ARP Network.
2X & Digi-Sign recognise the considerable benefits that this agreement will bring to both organisations and most importantly, the benefits that it will bring to you. Learn more about the ARP Network below:
As a 2X partner, you are automatically an official member of the ARP Network. However, you will need to complete the following Digi-Access™ Certificate Request [8] form to gain access to the ARP Extranet.
The ARP Extranet is a secure area where you can get confidential documents and other sales collateral from the ARP Extranet Download area and also get quotations, place orders and view your account statements.
Once you have received your ARP Extranet Digi-Access™ Certificate, use the following links to:
Links:
[1] https://www.digi-sign.com/downloads/download.php?id=2x-arp
[2] http://www.2x.com/whitepapers/
[3] https://www.digi-sign.com/blog/2x
[4] https://www.digi-sign.com/arp/2x/digi-ssl
[5] https://www.digi-sign.com/order/arp/digi-ssl
[6] https://www.digi-sign.com/arp/2x/complete+program#selling
[7] https://www.digi-sign.com/arp/2x/complete+program#join
[8] https://on-site.digi-sign.com/IdApply/v32/raid?eID=U2FsdGVkX1/QM0F5qGNPz3t445kT0x2tCFfbZiDQlmwL5qnlgvAQMkpphQiUnrDC9zmB%2BrQiK8E=
[9] https://www.digi-sign.com/arp/2x/complete+program
[10] https://www.digi-sign.com/arp/2x/help/guide
[11] https://www.digi-sign.com/arp/2x/help/demo
[12] https://www.digi-sign.com/arp/2x/help/configure
[13] https://www.digi-sign.com/arp/2x/help/setup
[14] https://www.digi-sign.com/digi-access/distribute
[15] https://www.digi-sign.com/arp/ordering
[16] https://www.digi-sign.com/arp/accounts
[17] https://www.digi-sign.com/arp/2x/help
[18] https://www.digi-sign.com/support/digi-ssl/Microsoft+iis+5+iis+6
[19] https://www.digi-sign.com/support/digi-ssl/install-certificate/microsoft-iis56
[20] https://www.digi-sign.com/arp/2x/help/enrol
[21] https://www.digi-sign.com/demoexec/2x/enrol.php
[22] https://www.digi-sign.com/arp/2x
[23] https://www.digi-sign.com/user/login
[24] https://www.digi-sign.com/user/register
[25] https://www.digi-sign.com/demonstration/2x/
[26] https://www.digi-sign.com/demonstration/2x/enrol.php
[27] http://www.2x.com/applicationserver/
[28] https://www.digi-sign.com/downloads/download.php?id=digi-access-403
[29] http://technet.microsoft.com/nl-nl/library/cc753103(WS.10).aspx
[30] https://www.digi-sign.com/403-7.htm
[31] https://www.digi-sign.com/403-12.htm
[32] https://www.digi-sign.com/403-13.htm
[33] https://www.digi-sign.com/403-16.htm
[34] https://www.digi-sign.com/403-17.htm
[35] https://www.digi-sign.com/support/digi-access/iis
[36] http://www.digi-sign.com/downloads/certificates/dsroot/Digi-Sign_Root_CA.cer
[37] http://www.digi-sign.com/downloads/certificates/digi-access/Digi-Sign_CA_Digi-Access_Xs.cer
[38] https://www.digi-sign.com/arp/2x/help/ou
[39] https://www.digi-sign.com/arp/2x/help/configure#ou
[40] https://www.digi-sign.com/demoexec/2x/
[41] https://www.digi-sign.com/certificate+authority
[42] http://msdn.microsoft.com/en-gb/ie/default.aspx
[43] mailto:support@digi-sign.com
[44] https://www.digi-sign.com/arp/2x/help/mozilla+enrol
[45] https://www.digi-sign.com/arp/2x/help/ms+enrol
[46] http://www.2x.com
[47] https://www.digi-sign.com/digi-access
[48] https://www.digi-sign.com/arp/2x/extranet
[49] https://www.digi-sign.com/digi-ca/total+trust+management
[50] https://www.digi-sign.com/demoexec/2x/index.php
[51] https://www.digi-sign.com/demos/instructions/digi-access
[52] https://www.digi-sign.com/arp/2x/help/delete
[53] https://www.digi-sign.com/arp/order/digi-ssl-service/index.php
[54] https://www.digi-sign.com/downloads/download.php?id=digi-access-user-pdf
[55] https://arp.digi-sign.com/2x/index.php